
Aims of the lesson.
To develop your understanding of creative imagery
To help you identify where you may have used Creative Thinking skills so far in the course.
Tasks
1) Develop initial design ideas for your 'Digital Post-it' for the Independent Enquirer category of the PLTS.(15 mins)
To insert your Creative Thinker 'Digital Post-it' into your blogs in as many places as you can where you can show that you` ve used that skill.(15-20 mins)
Independent Enquirer
Work out what questions to ask to answer a problem
Plan and carry out research, understanding what my decisions might lead to
Look at situations, issues and problems in lots of different ways
Review the information I have to see if it is useful or important
Understand how different people` s views or unplanned events may alter my plans
Back up my conclusions with reasoned arguments and evidence
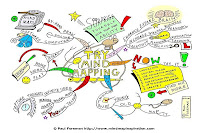
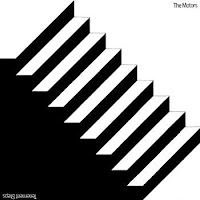
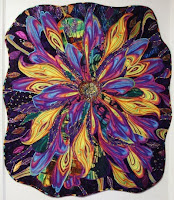
For this lesson, I created a starter, using image cards and getting the students to work as a Team to match the images into which category of the PLTS they thought it represented.
These were the images I found for the cards. See which category you think each one represents...
The 6 PLTS Categories
Independent Enquirer
Creative Thinker
Reflective Learner
Team Worker
Self Manager
Effective Participator


How to insert your Digital 'Post its' into your Blog.
Ensure image is in J- Peg format
Sign into your Blog
Click on 'View Blog'.
Find a place within one of your posts that you feel that you have used one of the PLTS skills. (Refer to the specific sentences listed in each category.) Remember the name of that post.
Click on 'New Post'
Click on 'Edit Posts'
Find the name of the Post that you want to add your Digital 'Post it' into and double click on 'Edit'
Find 'Add image' from the Tool bar along the top of the post and double click on it
Click on 'Browse'
Find your 'Post it' Design and Double Click on it
Where it says 'Choose a Layout' select 'None'
Where it says 'Image size' select 'small'
Click on 'Upload image'.
Your image will appear at the top of your Blog Post: Select it and drag it to the position in the post where you have identified your use of this skill
Add some large or colourful text next to the image identifying which sentence of the PLTS skills you feel that you have met.
Add some smaller text describing how you have met this sentence. What did you do? What did you learn from doing it?

0 Comments to "PLTS Designs lesson 2"