
Photoshop
Using Layer Masks
PHOTOSHOP
Using Layer Masks.
You can use a layer mask to control how different areas within a layer are hidden and revealed. By making changes to the layer mask, you can apply a variety of special effects to the layer without actually affecting the image on that layer.
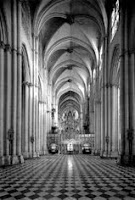
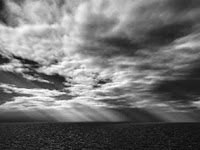
1) Go to File > Open > Publish > Students > Images and open the images Clouds and Church.
2) Select the Move tool from the toolbox and then placing it in the clouds image, click and drag the image over into the church image and position it at the top.
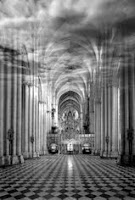
3) The clouds image now occupies its own layer. Click on the add layer mask icon at the bottom of the layers palette.
4) Make sure that black and white are the foreground and background colours respectively. Select the Linear Gradient tool from the toolbox.
5) Click and drag upwards on the clouds picture, from the horizon line to halfway into the clouds, then release. Once released, the Layer Mask causes the upper layer to seamlessly fade into the one below.
6) Select the Paintbrush tool and choose a brush from the Brushes palette. Select a suitable size and lower the opacity to 25% or lower.
7) Use black to further remove areas of the Layer Mask or white to replace. In the brush options, select different modes in the dropdown menu to see how the image changes.
………………………………………………………………………………..
Using Layer Masks


PHOTOSHOP
Using Layer Masks.
You can use a layer mask to control how different areas within a layer are hidden and revealed. By making changes to the layer mask, you can apply a variety of special effects to the layer without actually affecting the image on that layer.
1) Go to File > Open > Publish > Students > Images and open the images Clouds and Church.
2) Select the Move tool from the toolbox and then placing it in the clouds image, click and drag the image over into the church image and position it at the top.
3) The clouds image now occupies its own layer. Click on the add layer mask icon at the bottom of the layers palette.
4) Make sure that black and white are the foreground and background colours respectively. Select the Linear Gradient tool from the toolbox.
5) Click and drag upwards on the clouds picture, from the horizon line to halfway into the clouds, then release. Once released, the Layer Mask causes the upper layer to seamlessly fade into the one below.
6) Select the Paintbrush tool and choose a brush from the Brushes palette. Select a suitable size and lower the opacity to 25% or lower.
7) Use black to further remove areas of the Layer Mask or white to replace. In the brush options, select different modes in the dropdown menu to see how the image changes.
………………………………………………………………………………..

0 Comments to " "